Browsing Tag

Nails Inc

Nails, News

Free Nails Inc. polishes with Glamour

November 11, 2014
Free Nails Inc with Glamour

Free Nails Inc with Glamour

Free Nails Inc with glamour magazine


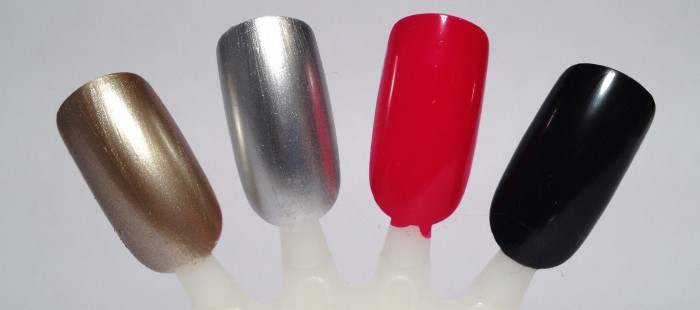
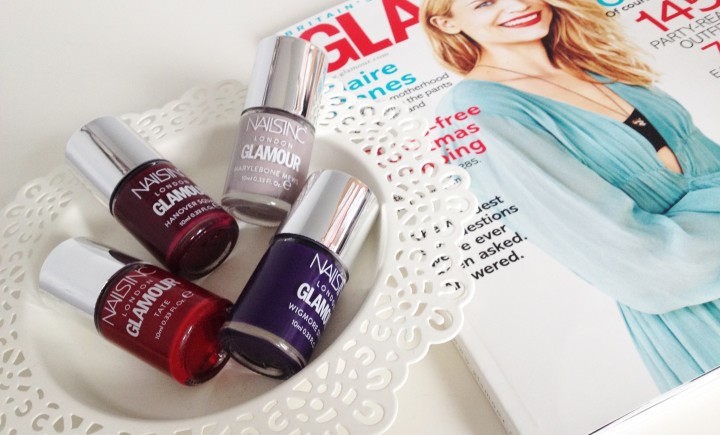
This month Glamour are really spoiling us with four very autumnal polishes from Nails Inc – Tate, Hanover Square, Marylebone Mews and Wigmore Street.  They are all absolutely gorgeous shades and worth £11 each, so considering the magazine is only £2.00 you’re getting £44.00 of nail polishes for £8 (which is far too much of a bargain for anyone to resist I’m sure!)

All four were instant must-haves for me, but I think the very vampy purple hues of Wigmore Street have stolen my heart and pride of place on my nails for the foreseeable future!

Also included is a 20% off H&M voucher and a Body Shop “Little card of Christmas wishes” worth between £3 and £1000!

Usually I find I have to search around a bit to complete a magazine freebie collection, but I’ve seen all four shades in plenty of shops this time around so if you’re after all four head out now whilst they are plentiful!

Totally hellbent for Glamour filling up at least half of my Nails Inc collection over the past few years!

– Gem

Beauty Boxes

Glossybox September 2014

September 22, 2014
Glossybox September 2014

Glossybox September 2014


Glossybox have fallen into my bad books lately. Not only have I received some terrible customer service but also I’ve found the past two boxes a little lacklustre. Considering I was singing their praises to the high heavens till recently, I still have hope that they will be pulling out some awesome boxes again but for now I can’t say that I’m particularly impressed.

The September 2014 Glossybox is designed by Karen Millen, and though I can honestly say I don’t think I’ve ever stepped foot in one of their stores, I do like the London imagery that covers the box this month.

Inside there are two full size products and six samples along with a £25 off voucher for Karen millen stores when you spend £150 (unlikely).


Glossybox September 2014 Model Co More Brows

ModelCo MORE BROWS Fibre Gel

The first full size product is a brow gel from ModelCo in light/medium. I saw the preview video with Binky from Made in Chelsea before the box was shipped and I was quite excited about this product, but I can’t say I’m particularly taken with it in person. I’ve tried these wand applicator brow gels before and I find them messier and less precise than my usual powders and pencils. Honestly this is likely going to end up in the back of a drawer somewhere unused because it’s just not enough to tame and shape my rather sparse brows, if you’ve naturally got a thicker brow though it would probably work a lot better for you!

Full Size

£14.95 from www.modelcocosmetics.com


Glossybox September 2014 mythic masque

L’Oreal Professionnel Mythic Masque

Next up is a replenishing and nourishing hair mask from L’Oreal. I was initially quite looking forward to trying this, but when you have to towel dry your hair before applying then get back in the shower to rinse it off? Who has time for that! It smells delicious and I have seen good things about this all over the web, so maybe I can convince myself that going through the bother of drying only to condition once more is a good idea (or more likely I’ll just apply it to wet hair >.>)

75ml Sample

£17.99 for 200ml from www.lookfantastic.com


Glossybox September 2014 SkinPep

SkinPep Enzyme and Acid Peel & Dark Circle Eraser

I do love getting products from lesser known companies but with only one sachet of eye-cream and two 3.5ml sachets of the face peel, I’m not sure if there’s enough product to really get a feel for them. The full sizes come at a pretty penny so it would be nice to get a slightly bigger sample to decide if you want to invest further or not. I really don’t feel that even a bundle of such sachets constitutes a place in Beauty Boxes if I’m honest, does anyone else feel this way and prefer to get at least a decent sized sample of even very high end products?

2x 3.5ml sample and 1x 2ml sample

£89.99 and £44.99 from Skinpep.com


Glossybox September 2014 Nails Inc matte topcoat

Nails Inc Westminster Bridge matte Top Coat

The only thing I really got excited about in my September Glossybox was this lovely matte topcoat from one of my favourite brands, Nails Inc. I’ve been wearing quite a lot of matte nails recently, but with a topcoat you can turn every polish you own matte! It’s a full size bottle which will last for absolutely ages, the brush is so easy to use and it dries pretty quickly for those of you (like me) who are always in a hurry to get your nails finished. Best product by a mile!

Full Size

£12 from NailsInc.com


Glossybox September 2014 Vichey


Vichy Normaderm Night Detox and Hydrating Care

I’m a big fan of Vichy skincare and even though these tiny samples are only 3ml, because they come in tubes rather than sachets you can likely get a few uses out of each one and thus a better feel for the products. The addition of both a day and night cream means these are perfect for throwing in an overnight bag for any impromptu adventures. I’ve not tried either of these creams before but both are products I’d be interested to purchase so even though I’m usually pretty meh about small skincare samples I’ll let this one slip just this once!

2 x 3ml samples

£12.00 for 40ml and £15.50 for 50ml from Boots.com


So overall I have to say this isn’t one of the best boxes I’ve received by a long shot, very heavy on the skincare samples and only one product that I can really get excited about. I’ve not seen many reviews for alternative products this month though, did you get anything different in your box?

Totally hellbent for Nails Inc saving the day

Gem

Nails

Free Nails Inc. With InStyle

May 17, 2014
Free Nails Inc. With InStyle

Free Nails Inc. With InStyle

I seem to have quite a collection of Nails Inc. polishes, yet I’ve never purchased a single one at full RRP! Most of my collection has come from free gifts with magazines and I was over the moon to spot another freebie this month with InStyle.

There are three shades to choose from, but as I’m (supposed to be) on a spending ban this month, I only picked up one shade (booo) – Sao Paulo Streets. I’m not sure of the names of the other two shades, but there is a pink and a coral red that both look lovely.

Sao Paulo Streets is a lovely mink nude with a subtle lilac undertone, very grown-up and understated. As with all Nails Inc. polishes application is a breeze and you’re guaranteed at least a few days wear before chipping.

Have you picked up one of the three Nails Inc. shades from InStyle yet?

Totally hell bent for a quick magazine freebie pick me up.

– Gem


Nails

Colourful Leopard Print Nail Art Tutorial

February 16, 2014

Today I had every intention of sorting out my make-up and varnishes that have seemingly ended up taking over the entire corner of the bedroom. What actually happened is I found this really garish Pink nails inc colour that I’ve never worn, shook my head and took it upon myself to use it. So instead of organising and stacking, I’ve created a cute little tutorial for you all.

You will need:

  • Base colour (something light preferably) I’m using Nails inc London in “Notting Hill Gate”
  • Complimentary colour to your base for spots I’m using Avon Nailwear pro + in “Sea Breeze”
  • A black varnish – for this, my trusty nails inc in “New York Noir”
  • A nail art brush or an old paint brush


notting-hill-gate


*Funny story – when looking for the colour of this Barbie Pink, I almost thought it was “Flammable” as it was scrawled across the bottom of the bottom! But seriously – how hilarious is this pink?*

Paint your base coat first – I had to use three coats just to make this colour look presentable. Honestly – it’s the least “like me” colour ever!

sea-breeze

Once this is dry, take your complimentary colour and dot it onto each nail. Don’t use too much because you don’t want to end up with raised bumps. I picked the green because it reminds me of the adorable coral and blue colours around at the moment, but you can use whatever colour you think goes well together.

elegant-touch

In between coats I’ve been using Elegant Touch rapid dry for nails to try and speed up the process as well as at the end. (It’s absolutely brilliant!). Take your black and your nail art brush/paint brush/tooth pick whatever you’ve got, and gently sweep the brush around the edge of each circle, don’t complete the circle, leave a little gap on each one. The beauty of this is that it doesn’t have to be neat because it adds to the effect. You can also add a few extra black dots if you have some empty spaces.

leopard-nails

A note to you all, make sure you go to the loo before doing this – honestly, no matter what I do, whenever I paint my nails I end up having to faff around with something and smudging them! Slap on your top coat, leave to dry and it is done! How easy peasy is that?


I hope you’ve enjoyed my quick animal print tutorial, I’m definitely going to try this with some more “me” colours, I’m thinking red, grey and black next. If you’ve tried this out, I’d love to see your pictures!

Totally hellbent for using even the most disgusting nail varnishes

-Pants

Nails

Snowman Nail Art Tutorial

December 20, 2013

It’s not long before I ditch the festive cuties for the elegant red and gold nails for Christmas day. (I’ll show you guys nearer the day!) So here’s another quick and easy cute festive nail art!

What I used:

  • Etos Quick Dry in White
  • Kate Spade Nails inc in “New York Noir”
  • Kate Spade Nails inc in “Soho Silver”
  • Avon Nailwear Pro + in “blue escape”
  • Jesse’s Girl in “Beauty Guru”
  • Nail art brush/dotter (you can use an old painbrush and tooth pick)

blue

I used blue for the base – there’s something about this colour that makes me think of Christmas (and Gemma!).

snowman

Next paint two circles on your “feature nail” to form the Snowman”

snow

Using a dotter tool or toothpick, add some “Snow” to the rest of the nails

snowflake dots


snowflake full

Taking a silver, make 5 small dots and a dot in the middle to form little Snowflakes. This is a bit like a tiny dot to dot.

eyes

Once dried, add some little hands, eyes and buttons on the Snowman

full

Finish up with an Orange nose and a top coat!


Totally hellbent for all of the blue things

-Pants


Nails

Reindeer Nail Art Tutorial

December 18, 2013

My second festive nail of 2013! These cute little reindeer’s are pretty easy to do.

What I used:

  • Etos quick dry in blue and white (see here for my latest Etos Rotterdam spoils)
  • Kate Spade New York by Nails inc in “New York Noir” (This colour is absolutely amazing) for my black
  • Avon Nailwear Pro + in “Vintage Boutique”
  • Révérence de Bastion “No 4″
  • A brush and dotter tool
  • Obligatory Nails inc top coat

basecoat


Start with your base colour (not to be confused with your base coat, which you have already applied – obviously!). I went for this beautiful blue, but you can choose whatever you like.

browncoat

Using the brown, paint the top middle of each nail. Almost as if you are painting a nail on your nail.

ears

Using your brush tool, add some ears and some antlers. This doesn’t have to be neat, if looks a little funkier and adds to the effect if it isn’t completely perfect.

whiteeyes

Once dry, use your dotting tool to add some eyes.

nose


Add a nose to each nail, just put a blob of black varnish where you wan’t it. I used a red for one of my nails.

blackeyes


Finish up by adding a black eye on top of your white with the dotter tool and once dry, add your top coat.

Have you dabbled with some festive nail arts recently? If so, we’d love to show what you’ve been up to!

Totally hellbent for character infused nails

-Pants


News

Penguin Nail Art

December 4, 2013

Well it’s official, we are now in December and Christmas is flying full speed and head first towards us.

The best thing about this time of year, is being able to paint your nails with lots of festive things, so my first Nail Art for the Christmas period is this totally adorable and really easy peasy Penguin. Honestly, this is one of the easiest nail art’s I have done in a long while, so for those that are a little shakey with their other hand, hopefully you will manage this!

I am using the following:

  • Kate Spade New York by Nails inc in “New York Noir” (This colour is absolutely amazing)
  • O.P.I in “The Drummer is Hot” from the Rock Goddess range
  • A white nail art pen – I would recommend a white nail varnish for this, as mine has gone walkies I was forced to use a nail art pen which was a little gloopy for this.
  • Nails inc Top Coat.
  • A dotting tool

Start by painting your nails black and leaving to dry.

black

Next take your white, and paint the middle of the nail up to the tip:

white

white full


With a dotting tool, add some eyes:

eyes

Finally, use your dotting tool to add some feet and a beak. I dragged the dotting tool slightly to give on oval shape for the feet and a triangle shape for the nose but a circle works just as well:

full


Apply your favorite top coat and smile! Are these not the cutest things ever? (Yes, I know I always say that about nearly all my nails!)

Hopefully I’ll have a few more festive nails before the Christmas season is up!

Totally hellbent for the first Christmas nail of the season

-Pants


Nails

Free Nails Inc. with Glamour Magazine.

November 20, 2013

Kate Spade Nails Inc Soho Silver

Glamour have really been busting out the big guns recently when it comes to freebies!

This month’s freebie is a choice of four gorgeous Kate Spade for Nails Inc. polishes! I made a smash and grab for Soho Silver, but soon went to track down the other three available shades Big Apple Red, New York Noir and Uptown Glamour.

Kate Spade for Nails Inc Glamour promotion

They are full size 10ml polishes with an RRP of £11, so you can get the whole set worth £44.00 for a bargain busting £8!

Kate Spade Nails Inc Swatches

Nails Inc. have a great formula, and all four applied smoothly and easily. Drying time is fast and they are pretty resilient to chipping.

Totally hellbent for more nail varnish that I really didn’t need (but really wanted!)

– Gem